Installing/Configuring the Portal solution in Dynamics 365:
After successive registration of Microsoft Dynamics 365, don’t forget to configure the Portal Solution by navigating the Dynamics 365 in Office 365 Admin Centers.

Click Applications and select Portal Add-On, as its status is not configured it means you have to configure it out as per your organization requirements. So click the circled pencil icon to manage the portal solution.

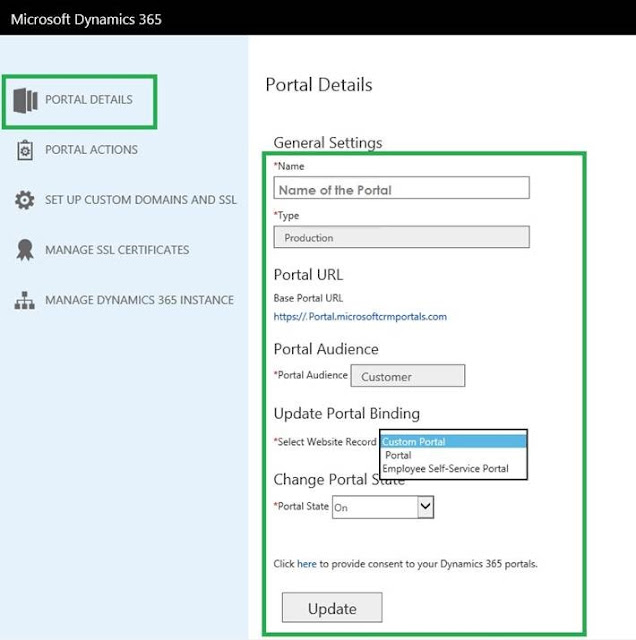
Click Portal Details to add the following inside information:
1. Name: Put a suitable name for your organization’s portal.
2. Type: Select the type of your instance is Live or Dev (Production or Sandbox) respectively.
3. Base Portal URL: Set the URL to access the portal.
4. Portal Audience: Select the consultations whether it will be Customers or Employees.
5. Select Website Record: There are 3 types of portals available out of the box (as shown in the below image), select 1 to get started. You can swap it in future but remember you can only use one at a time.
6. Portal State: Turn it On when you want it to get visible for the audience, otherwise make it Off.
7. Update: After putting all the info press this button OR every time you make changes click update, in the end, you will find a message saying the update has been done successfully on the top of this form.
By Clicking Portal Actions you can perform various activities:
1. Add a custom Domain Name: By adding SSL Certificate, you can upload a new SSL certificate but it must be a Personal Information Exchange (.pfx) certificate file that is less than 2 MB in size.
2. Make sure it is not expired and that it is SHA2 encrypted because SHA1 encrypted certs have been deprecated - or also use the existing one. P
3. provide a Hostname, then binds it and do confirmation. By following these steps you can able to add a custom domain name to your portal.
4. Restart: You can restart/refresh your portal.
5. Update Dynamics 365 URL: Whenever you change or modify your portal URL you can update it from here.
6. Install Project Service: You can directly install Project Service Extension from here.
7. Install Field Service: You can directly install Field Service extension from here.
8. Get Public Key: The Microsoft Dynamics 365 platform applies an additional security restriction to registered offline plug-in assemblies.
9. When Microsoft Dynamics 365 for Microsoft Office Outlook with Offline Access is installed, an AllowList key is added to the system registry on the client computer.
For each assembly containing an offline plug-in that you register, you must add a registry sub-key under the AllowList key with the key name derived from the assembly’s public key token. Failure to add this key results in the offline plug-in not being executed by the platform even though the plug-in is registered. This walkthrough describes how to add this sub-key for a plug-in assembly. {Reference}
Configuring Web Roles in Microsoft Dynamics 365:
As at least a user account of yours has to be to configures in the Portal with having the administrative rights in order to edit, add/remove the items, entities, titles, polls, check out boxes, and other things you need to apply on to your Portal.
Navigate to the Dynamics 365 portals -> Web roles -> you should be able to find the web roles there and you can also able to create new web roles to dedicate it, to the Super Admin User/Contact in order to apply changes on to the portal.

Using Super Admin Rights on Portal Interface:

Using Super Admin Rights on Portal Interface:
By going to the URL that you have set earlier in the portal configuration, you can able to open the portal website and get in by signing in. If you have Admin role then you can do the following:
1. By redeeming the code get to log in as Administrator.
2. Link your CRM Entity Forms with your Portal.
3. Edit, Add/Remove Navigational items.
4. Create child Pages.


This comment has been removed by the author.
ReplyDeleteThanks for sharing your knowledge about Dynamic CRM.
ReplyDeleteIndeed helpful.
Hosted portal solutions