Now you can create and standardized
your all business templates from Microsoft Dynamics CRM on-premises &
Online by using Microsoft Word and Microsoft Excel Templates. In order to make
it more easier for users I have broken down the process into the following
steps;
Step-1: Create a Word template for
Order
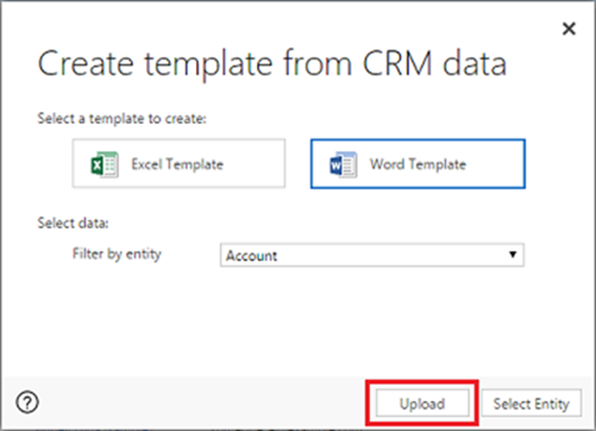
First of all, you need to go to Settings >
Templates > Document Templates > Create
New > you will find 2 types of templates available 1)
Excel 2) Word. Select Word template then Select Order
from the drop down list of Filter by Entity then click Select
Entity.
You will find three types of
relationship of the entity, (as shown in the fig.1.1) The relationships
you select on this screen determine what entities and fields are available
later when you define the Word template. Only select relationships you need to
add CRM data to the Word template. In this case we will select only Account
from many to 1 relationship then click Download Template. A
blank template with the entity name and current date will be downloaded.

Step 2: Enable the Developer
tab
Open the Word template file that has
been downloaded. At this point, the document appears to be blank.
You have to enable Developer Tab
first into Microsoft Word for XML Mapping. Remember, the following are
the supported versions of Word.
- MS Word 2013 & 2016
Go to File > Options > Customize
Ribbon, and then enable Developer. (As shown in
Fig)

Resolving the stayed issues:
There are some stayed issues, to
prevent those problems with control fields, do the following:
·
Only add fields as Plain Text or
Picture.
·
Use the XML Mapping Pane to add CRM
entity fields to your Word template.
·
Be sure to only add fields as Plain
Text or Picture.
·
Deselect Capitalize first letter
of sentences and Automatically use suggestions from the spelling checker. by
going to the following path File > Options >
Proofing > AutoCorrect Options.
·
Deselect Hyphens (–) with dash (-)
on the AutoFormat and AutoFormat as You Type tabs.

Step 3: Setting up the Word Template
Now you have to design and modify as
per your desired text file by using the XML Mapping Pane to define
the Word template with CRM entity fields, (As shown in the Fig 3.1).
Drop down the Custom XML Part and select um:microsoft-crm/document-template/account/1/,
Drop down the Custom XML Part and select um:microsoft-crm/document-template/account/1/,

CRM entity, select and Right
click the desired field > Insert Content Control > Plain Text


The desired field will be shown in
the document that has a correlation with the Microsoft dynamics CRM.
As shown fullname & emailaddress1 are the two selected fields from the list of the Account entity of CRM.
Design the document and map the entities in that document as per your requirements and save the document in your hard drive.
As shown fullname & emailaddress1 are the two selected fields from the list of the Account entity of CRM.
Design the document and map the entities in that document as per your requirements and save the document in your hard drive.
Step 4: Upload the Saved Document
If you have access and rights of
an admin then you can upload the Word/Excel template into CRM by following
method;
In your CRM, go to the Settings
> Templates > Document Templates > Click Upload
Template and Browse the Word file that
you have set and saved or you can also Drag and drop that file in the
dialog box then Click Upload.

If you do not have the rights of an
admin then you can upload the Word/Excel Template by using the following
method;
In your CRM, open a page with a list
of records, for instance, the list of customer accounts in Sales then select a
single item for example a contact or an account, click More
(…) > Word Templates > Create Word Template then Click
Word Template > Upload.
Step 5: Use your Document Template
for records in CRM
For using your designed & set
document go to any of your saved record in your CRM application for instance Sales
> Accounts > More (…) >Word Template > Your saved Word File, (As
shown in the Fig 5.1)
Then the file will be downloaded.
Then the file will be downloaded.

Open the downloaded file and you are now able to see the information that has been mapped earlier in the designing phase of the document. As you can see in the below figure both of the fields have been populated with the data that CRM have.

Note:If the template you created is not visible, there are two
possibilities;
1. Just those templates created for the selected record type (entity) will
be shown. For instance, if you open an invoice record, you will not see a
template you created for the Account entity.
2. You need to refresh CRM to see the template.
3. Either refresh your browser or close and reopen CRM.


Needed to compose you a very little word to thank you yet again regarding the nice suggestions you’ve contributed here.
ReplyDeleteExpence Reports